
Refreshing bathroom cabinets can significantly transform the overall appearance of the space, providing a clean and updated look without the necessity of a complete remodel. This guide outlines the essential steps for painting bathroom cabinets, including gathering materials, preparing surfaces, selecting the appropriate paint, and achieving a professional finish. Furthermore, maintenance tips will be provided to ensure that the newly painted cabinets retain their pristine condition. If you are prepared to enhance the style of your bathroom, let us proceed with the process.
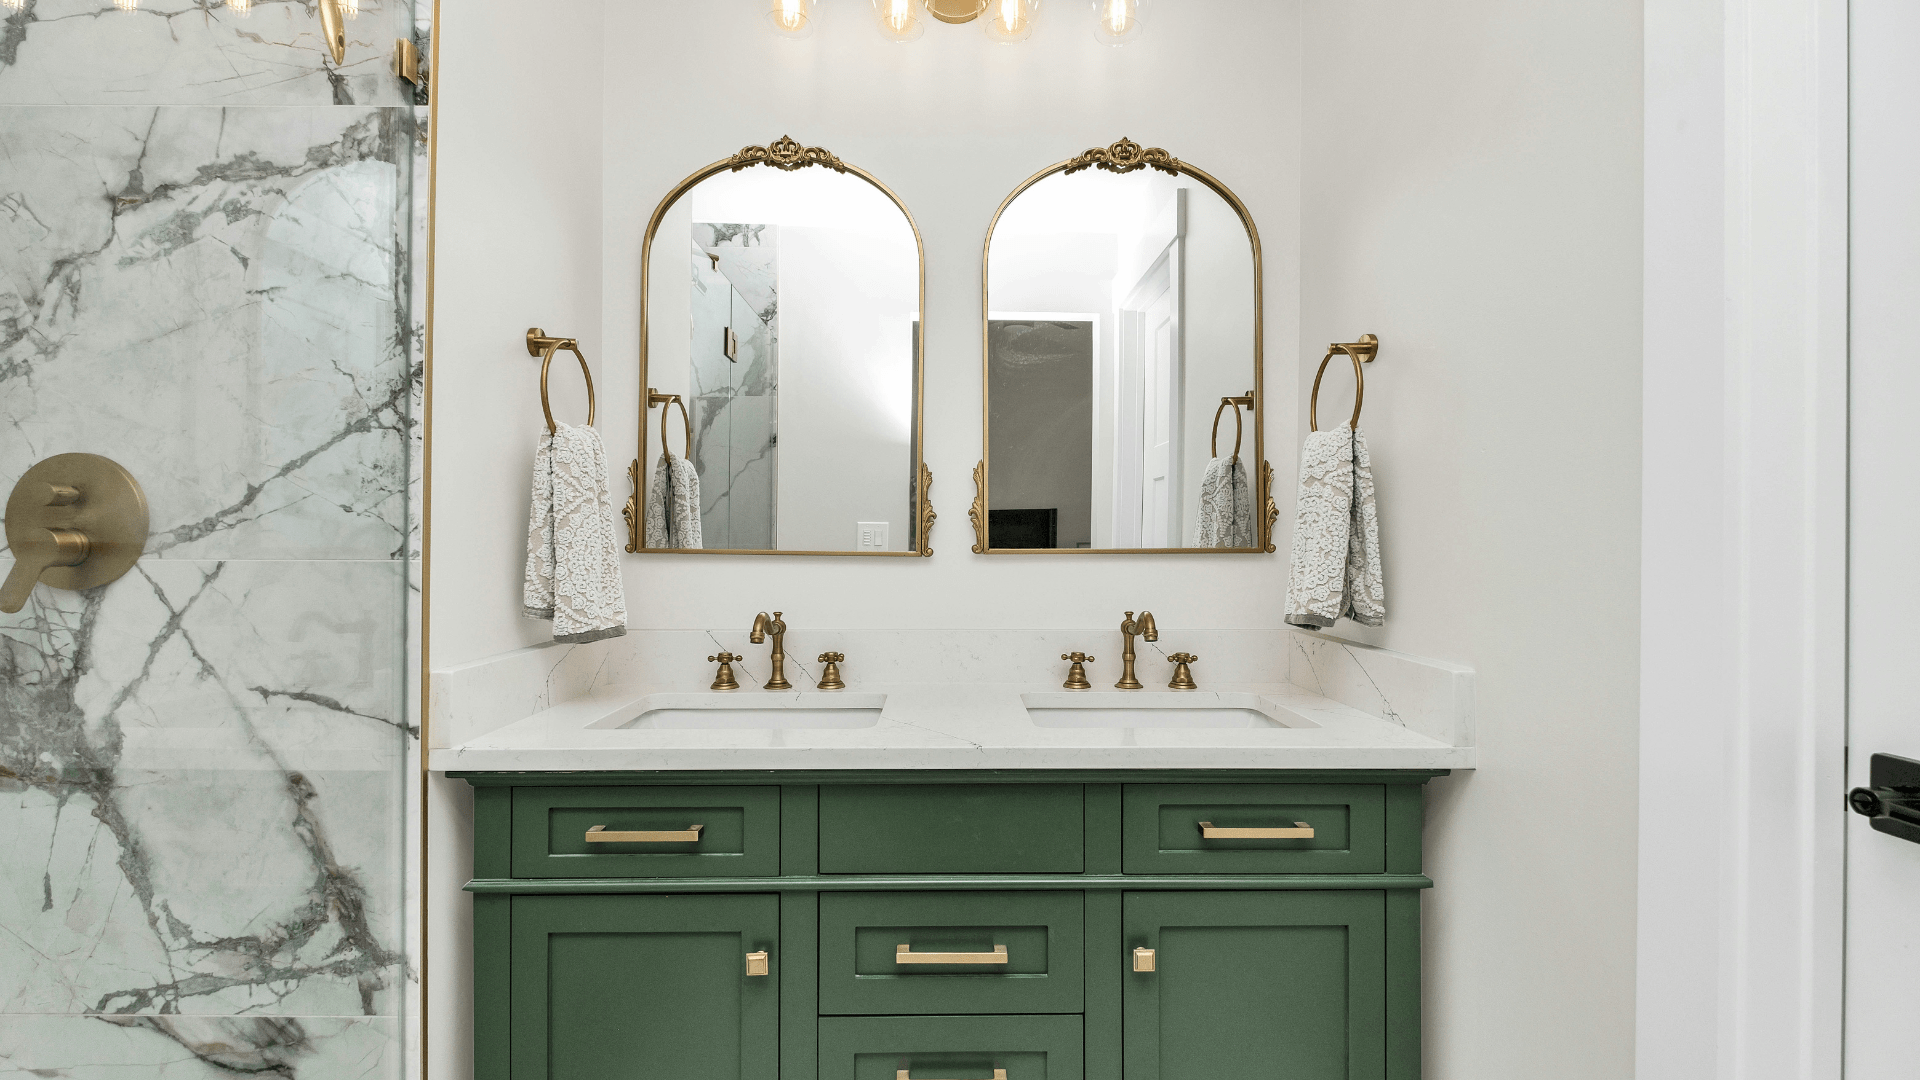
Preparation for Painting Vanity Cabinets
.jpg_00.jpeg)
Preparation for painting bathroom vanity cabinets is a critical step that requires careful planning and organization to ensure the success of a do-it-yourself home improvement project. This process involves gathering the necessary tools and materials, including paint, primers, and brushes, as well as carrying out essential tasks such as cleaning and removing cabinet doors and hardware.
Adequate preparation can greatly improve the quality of the finish, ensuring that the paint adheres properly and has a prolonged lifespan. This initial stage lays the groundwork for selecting appropriate colors and techniques that will ultimately enhance the overall decor of the bathroom.
Gather Materials
Gathering materials is a critical initial step in the process of preparing to paint bathroom vanity cabinets, as it ensures that all necessary items, like decorative accessories, are available for a seamless undertaking. It is advisable to select high-quality paint from reputable brands such as Sherwin Williams, Benjamin Moore, and Behr. Additionally, essential tools including brushes, rollers, and paint primer should be included to enhance adhesion and finish. It is also important to remember to procure cleaning supplies and wood filler for any required repairs.
To achieve optimal results, one should consider the type of paint that is best suited for bathroom environments, prioritizing moisture-resistant formulations capable of withstanding humidity. Acrylic latex paint is a popular choice due to its durability and ease of cleanup, while oil-based paint provides a hard, long-lasting finish. The use of a suitable primer should not be overlooked; a high-quality bonding primer can effectively block stains and improve paint adhesion.
Essential tools include:
- Quality paint brushes for detailed work
- Rollers for larger areas
- Drop cloths to protect floors and surfaces during the renovation
- Sandpaper or sanding blocks to prepare surfaces
- A paint tray for convenience
When selecting products, it is important to consider the desired finish—glossy finishes are more resilient and easier to clean, while satin finishes offer a softer aesthetic. It is always advisable to test paint samples in the lighting of the bathroom to identify the perfect hue.
Remove Cabinet Doors and Hardware
Removing cabinet doors and hardware is a fundamental step in the preparation process for painting bathroom cabinets, as it facilitates easier access to all surfaces and contributes to a smoother finish.
This initial task extends beyond merely detaching the doors; it is also a critical component in achieving a professional-looking result. When undertaking this project, it is essential to first gather all necessary tools, including screwdrivers, pliers, and a marker for labeling each piece as it is removed. Subsequently, it is advisable to establish a dedicated work area where each component can be organized.
- Label each hinge and screw with corresponding numbers or letters to simplify the reinstallation process.
- Consider placing hardware in labeled bags or containers to prevent misplacement.
- Take photographs of the cabinet assembly to serve as a visual reference for future reference.
By meticulously managing these components, one creates conditions for a more efficient painting experience, ensuring that the surfaces are properly prepared and cleaned, which ultimately enhances the longevity and appearance of the finished cabinets.
Clean and Sand Cabinets
Cleaning and sanding cabinets are essential steps that ensure a smooth surface for painting, facilitating improved paint adhesion and a flawless finish.
Before commencing the painting process, it is imperative to recognize the importance of thorough cleaning and sanding. A well-prepared surface not only eliminates contaminants but also exposes the underlying wood grain, which is crucial for achieving a rich and uniform appearance. To effectively address stubborn grease and grime, one should consider utilizing products such as ammonia-free degreasers or trisodium phosphate (TSP) solutions, as these products efficiently remove residues without damaging the surfaces.
- When sanding, it is advisable to begin with medium-grit sandpaper (between 120-220 grit) and subsequently transition to finer grit for a smoother finish.
- Power sanders can significantly expedite the process on flat surfaces; however, caution is warranted around edges and corners where manual sanding may be more appropriate.
- It is essential to conclude the process by vacuuming any dust particles and wiping the surfaces with a damp cloth before applying primer and paint to ensure optimal adhesion and prevent imperfections in the final coat.
Investing the time to properly clean and sand not only establishes a solid foundation for an aesthetically pleasing paint job but also guarantees that the new finish remains durable and long-lasting.
Prime Cabinets
Priming cabinets is a critical step in the painting process, as it significantly enhances paint adhesion and ensures an even finish. Utilizing high-quality primers such as Zinsser, KILZ, or INSL-X, it is advisable to apply the primer in thin, even coats to prevent drips and achieve a professional appearance. This step not only assists in covering any stains or uneven surfaces but also prepares the cabinets for the final paint application, resulting in a more durable and long-lasting finish.
When considering bathroom cabinet primers, it is essential to understand the various types available: oil-based, water-based, and shellac primers. Each type offers specific advantages, including the following:
- Oil-Based Primers: These are particularly effective for sealing stains and providing a smooth surface, making them suitable for cabinets exposed to moisture.
- Water-Based Primers: They dry quickly and emit fewer fumes, facilitating easy cleanup, scrubbing, and a safer application process.
- Shellac Primers: Renowned for their strong stain-blocking capabilities, these primers are ideal for covering persistent marks or discoloration.
When applying primer, it is important to use a high-quality brush or roller to ensure an even coat across all surfaces. Lightly sanding between coats is also recommended to achieve optimal results. Priming establishes a solid foundation for painting, making it a crucial step in transforming cabinets into beautiful, functional pieces.
Choosing the Right Paint for Bathroom Cabinets
.jpg_01.jpeg)
Selecting the appropriate paint for bathroom cabinets is essential for achieving a visually appealing and durable finish capable of withstanding the humid conditions commonly present in bathrooms. It is important to consider the various types of paint available, including acrylic, enamel, and waterborne options offered by reputable brands such as Sherwin Williams, Benjamin Moore, or Behr.
Furthermore, choosing a color that complements the bathroom decor can significantly enhance the overall aesthetic of the space, creating an inviting and stylish atmosphere while also ensuring long-lasting quality.
Consider Bathroom Conditions
When selecting paint for bathroom cabinets, it is essential to consider the unique conditions of the bathroom, particularly the levels of humidity and moisture present. Consider using alkyd paint or waterborne urethane enamel for durability.
The appropriate paint must possess the durability to withstand constant exposure to steam and water, which can lead to issues such as peeling, chipping, or mold accumulation. It is advisable to opt for moisture-resistant paint options specifically designed for high-humidity environments to ensure that the cabinets maintain their aesthetic appeal and functionality over time.
Choosing paint for a bathroom involves not only aesthetic considerations but also a focus on practicality. The characteristics of paint are vital in ensuring that it performs effectively in such challenging conditions.
- Durability: High-quality bathroom paint typically features a robust composition, enabling it to resist wear and tear, thereby preventing fading or degradation over time.
- Moisture Resistance: Paints containing moisture-resistant additives help minimize water absorption, thus preventing damage and prolonging the lifespan of the cabinets.
- Mold and Mildew Resistance: Certain paints are formulated with antimicrobial properties that inhibit the growth of mold and mildew, thereby maintaining a hygienic and visually appealing space.
By selecting paint that incorporates these features, home decorators can achieve a harmonious balance between style and practical functionality, ensuring that bathroom cabinets remain both visually appealing and protected against inevitable moisture exposure.
Choose the Right Type of Paint
Selecting the appropriate type of paint for bathroom cabinets is essential for both aesthetic appeal and longevity. Available options include acrylic, enamel, and alkyd paints from reputable brands such as Sherwin Williams, Benjamin Moore, and Behr.
When choosing paint, it is important to consider not only the visual qualities but also the practical attributes associated with each type.
- Acrylic paint is often preferred for its quick drying times and ease of cleanup, making it an ideal choice for individuals undertaking DIY projects.
- Enamel paints offer a hard, durable finish that can endure the moisture and frequent usage characteristic of bathroom environments, ensuring that surfaces remain well-protected.
- In contrast, alkyd paints are recognized for their excellent adherence and long-lasting durability, which makes them suitable for high-traffic areas, although they may require additional time for drying.
The selection of paint based on these properties not only influences the visual outcome but also significantly impacts the performance and durability of bathroom cabinetry.
Select a Color
Selecting a color for bathroom cabinets is a significant decision that can dramatically influence the overall decor of the space. Light colors can create an illusion of spaciousness and brightness, while darker shades may impart depth and elegance. When choosing a color, it is essential to consider the existing decor elements in the bathroom, including tiles, fixtures, and accessories, to ensure a cohesive look that enhances the overall aesthetic of the area.
In recent years, homeowners have gravitated towards various color trends that provide both style and functionality. For instance, soft pastels such as mint green or pale pink can evoke a serene ambiance, while bold hues like navy or deep forest green may create a more dramatic atmosphere.
- Neutral tones such as white, gray, and beige allow for versatile pairing with accessories and other fixtures.
- It is advisable to utilize color samples and swatches, as they will assist in visualizing how the chosen color interacts with lighting at different times of the day.
By thoughtfully selecting a cabinet color, individuals can not only elevate the appearance of their bathroom but also create a space that feels uniquely their own.
Steps to Painting Bathroom Cabinets
The process of painting bathroom cabinets requires meticulous preparation, application, and finishing techniques to attain a professional appearance. It is essential to begin by applying the first coat of paint, ensuring uniform coverage with high-quality tools such as rollers or brushes.
Following this, a thorough sanding process should be conducted before applying a second coat. Each of these steps is vital, as they contribute significantly to the final finish and durability of the paint job, ensuring that the cabinets not only exhibit an aesthetically pleasing appearance but also endure over time.
Apply First Coat of Paint
.jpg_10.jpeg)
Applying the first coat of paint is a critical step in the cabinet painting process, as it establishes the foundation for the overall finish. It is advisable to utilize high-quality brushes or rollers to ensure an even application, commencing from the edges and progressing toward the center of the cabinets. One should remain attentive to the paint's drying time and avoid excessive application to prevent drips and uneven coverage, which can negatively impact the final appearance.
To achieve a professional finish, it is essential for the user to adhere to specific techniques during the application of the first coat. The following tips may enhance the process:
- Work in Sections: Divide the cabinets into manageable sections to maintain control and focus, ensuring that each area receives adequate attention.
- Choose the Right Tool: Select brushes for detailed work and rollers for larger surfaces; this combination will yield a smoother finish.
- Monitor Drying Times: Always verify the recommended drying time for the paint being utilized, which aids in preventing errors such as lifting the paint when touching adjacent areas.
- Apply Even Pressure: Employ consistent pressure when rolling or brushing to avoid streaks or bubble formation.
By implementing these strategies, individuals engaged in DIY projects can significantly enhance the quality of their cabinet transformation endeavors.
Sand and Apply Second Coat
Sanding between coats is a crucial technique that facilitates better adhesion and contributes to achieving a smooth finish for painted cabinetry.
Once the initial coat has dried, it is advisable to lightly sand the surface using fine-grit sandpaper, typically around 220 grit. This effectively removes minor imperfections, such as dust particles and brush strokes. It is essential to apply consistent pressure throughout this process to ensure a uniformly smooth surface.
After sanding, it is important to thoroughly remove any dust using a tack cloth or a damp rag, as any remaining residue can adversely affect the adhesion of the subsequent paint layer.
- Use a sanding block to ensure even pressure distribution.
- Work in the direction of the wood grain to avoid scratches.
- Ensure proper ventilation during both sanding and painting activities.
This procedure not only ensures that the second coat adheres properly but also plays a significant role in providing a flawless final appearance, thereby enhancing the overall aesthetic of the cabinets.
Paint Cabinet Doors and Hardware
Painting cabinet doors and hardware is an essential aspect of the overall painting process, ensuring that every visible element harmonizes with the newly painted cabinets. It is advisable to utilize a fine brush for detailed work on hardware and edges, while considering the use of spray paint for a smooth finish on flat surfaces. Applying multiple thin coats will facilitate an even color and finish without drips or brush strokes, thereby enhancing the overall aesthetic of the bathroom decor.
To achieve optimal results, it is imperative to begin with proper surface preparation. This involves thorough cleaning and sanding to create an appropriate bonding surface for the paint. The application of a primer prior to painting can significantly improve adhesion, particularly for dark colors or uneven surfaces.
When selecting tools, one should consider the size of the area being painted—larger brushes and rollers are suitable for flat surfaces, while smaller brushes are more effective for corners and detailed areas.
The following tips are recommended for a successful painting project:
- Always work in well-ventilated areas to allow fumes to dissipate.
- Use painter's tape to protect surfaces that should remain unpainted.
- Ensure thorough mixing of paint to maintain color consistency, like Benjamin Moore's Retreat.
- Allow adequate drying time between coats to prevent smudging.
It is crucial not to rush the process, as patience is essential when it comes to painting. Adhering to these best practices will result in a professional-looking finish that revitalizes cabinetry.
Reattach Cabinet Doors and Hardware
Reattaching cabinet doors and hardware constitutes the final step in the cabinet painting process, effectively bringing the entire project to completion and restoring functionality to your bathroom. It is imperative to handle the freshly painted surfaces with care to prevent any damage, and utilizing the labels from the removal process will ensure the correct placement of each door and hardware component. Essential tools for this task include screwdrivers and pliers, which facilitate a secure fit and ensure a seamless finish.
Before commencing the reattachment, adopting a systematic approach can significantly enhance both efficiency and accuracy. It is advisable to organize your hardware; utilizing a storage kit or small containers will allow for the separation and labeling of screws and pulls. This level of organization not only accelerates the process but also minimizes the risk of misplacing essential components.
- Step 1: Align the cabinet doors with precision, ensuring they sit flush against the frame.
- Step 2: Begin with the hinges, gently inserting screws to avoid stripping the holes.
- Step 3: Verify the level alignment of each door before fully securing the hardware.
Taking a moment to step back and assess the placement will help ensure that everything appears uniform and functions properly. Allocating adequate time for this final reattachment will allow the cabinet to exhibit its new finish, thereby making your efforts truly worthwhile.
Tips for a Professional Finish Using Benjamin Moore Paints
To attain a professional finish when painting bathroom cabinets with Sherwin Williams products, several essential tips can enhance the results and ensure enduring beauty.
Utilizing high-quality tools, such as premium brushes and rollers, like those from Behr, facilitates a smoother application of paint, while applying thin coats helps to prevent drips and ensures even coverage.
Furthermore, allowing adequate drying time between coats is critical, as is the consideration of a protective top coat like Emerald Urethane Enamel to improve durability and resistance to moisture and wear.
Use a Quality Brush or Roller from KILZ
.jpg_11.jpeg)
The use of high-quality brushes or rollers is essential for achieving a smooth and professional finish when painting bathroom cabinets. High-quality tools are specifically designed to hold paint more effectively, facilitating even application and minimizing the likelihood of streaks or brush marks. Investing in the appropriate tools can significantly enhance both the appearance of the cabinets and the overall ease of the painting process.
The selection of suitable tools directly influences the painting experience and the final outcome. For example, consider using Zinsser products:
- Brushes with synthetic bristles are optimal for use with water-based paints, as they ensure even distribution and reduce the occurrence of drips.
- Conversely, natural bristle brushes are more effective with oil-based paints, contributing to a smooth finish.
When selecting rollers, it is generally advisable to choose one with a medium nap length of approximately 1/2 inch for most surfaces, as this provides a balance between porosity and smoothness. This choice allows for effective coverage while also imparting an appropriate texture. It is imperative to ensure that roller covers and brushes are clean and free from debris prior to commencing the painting process in order to avoid imperfections.
Ultimately, the careful selection of these tools not only facilitates ease of application but also enhances the final aesthetic, making the effort invested in the project truly worthwhile.
Apply Thin Coats with INSL-X Paints
Applying thin coats of paint is a critical strategy for achieving a flawless finish on bathroom cabinets. Thin layers dry more quickly and evenly, thereby reducing the risk of drips and ensuring a more polished appearance. It is advisable to apply multiple thin coats rather than a single thick one, allowing each layer to dry fully before the next application. This approach maximizes both adhesion and durability.
Utilizing thin coats can significantly enhance the quality of the finish, resulting in a smooth and even surface that conveys a professional look. The reduced drying time facilitates a more efficient painting process, enabling the completion of the task more quickly without compromising quality.
To achieve the ideal thickness for each coat, consider the following recommendations:
- Utilize a paint sprayer or a high-quality brush specifically designed for even application.
- Conduct a test on a small area first to determine the optimal layer thickness, using Benjamin Moore acrylic enamel.
- Allow each coat to dry according to the manufacturer's recommendations, as this can impact both adhesion and longevity.
Ultimately, the use of thinner layers not only improves aesthetic appeal but also contributes to the lifespan of the paint, making it more resistant to wear and tear.
Allow Proper Drying Time Using TSP
Allowing sufficient drying time between coats is critical for achieving a professional finish when painting bathroom cabinets. Each layer of paint necessitates adequate time to dry to ensure that the subsequent coat adheres properly and contributes to a uniform appearance. Rushing through the drying process can result in problems such as peeling, bubbling, or uneven texture, ultimately compromising the quality of the work.
To achieve optimal results, it is important to monitor the drying times of the paint diligently. Typically, paint may feel dry to the touch within a few hours; however, this does not indicate that it has fully cured. To determine whether a coat has dried completely, consider the following guidelines:
- Conduct a "finger test" by gently pressing your fingertip on the painted surface; if the paint feels tacky, it is not yet ready for another coat.
- Adhere to the manufacturer’s recommendations for drying times, as these can vary based on the type of paint used and prevailing environmental conditions, especially when using Sherwin Williams products.
- Utilize a fan or dehumidifier in the room to enhance airflow and reduce humidity, thereby facilitating the drying process.
Best practices for timing between applications include waiting at least four to six hours before applying a new layer, with longer intervals recommended for thicker paints. Each of these steps will contribute to ensuring that the final result is smoother and more durable, thereby elevating the overall quality of the cabinetry project.
Consider Adding a Protective Top Coat Like Emerald
Considering the application of a protective top coat after painting bathroom cabinets can significantly enhance both durability and water resistance, thereby making it a prudent choice for areas susceptible to moisture. A top coat serves to seal the paint, providing an additional layer of protection against wear and tear while preserving the aesthetic quality of the finish. Options such as waterborne urethane finishes, such as INSL-X, can impart a pleasing sheen while ensuring that the cabinets endure daily use.
Along with waterborne urethane, a variety of protective top coats are available, each offering distinct advantages. For instance, polycrylic finishes provide a clear protective layer that is less likely to yellow over time, rendering them particularly suitable for light-colored cabinets. Conversely, oil-based varnishes can produce a richer finish that enhances the natural grain of the wood, although they may necessitate longer drying times and can emit stronger odors.
- Application Tips: Before the application of a top coat, such as Retreat, it is essential to ensure that the paint is completely dry. It is advisable to use a high-quality brush or foam applicator to avoid brush marks.
- For an optimal finish, gently sand the painted surface with fine-grit sandpaper between coats.
- Apply thin, even coats, allowing adequate drying time between each layer. This approach will help maintain the integrity of the paint job while providing the required protection.
By adhering to these precautions, one can enjoy the appealing appearance of newly painted cabinets, coupled with the assurance of enduring protection.
Maintenance and Care for Painted Bathroom Cabinets with Travertine Tray Accessories
Maintaining and caring for painted bathroom cabinets is crucial for preserving their aesthetic appeal and longevity, thereby ensuring that your investment remains secure.
Regular cleaning with gentle, non-abrasive products, like those used with a soap dispenser or diffuser, is essential to prevent the accumulation of dirt and grime, while routine inspections for any signs of wear or damage can facilitate timely intervention before issues become exacerbated.
Proper care entails a thorough understanding of the appropriate cleaning techniques and products, such as a waffle bath mat or solid wood stool for organization, which will contribute to keeping the cabinets looking fresh and vibrant.
Frequently Asked Questions
What materials do I need to paint bathroom cabinets?
To paint bathroom cabinets, you will need the following materials: primer, paint, paintbrushes or rollers, sandpaper, drop cloths, and a screwdriver to remove hardware.
What is the best Sherwin Williams paint for bathroom cabinets?
The best type of paint for bathroom cabinets is a high-quality, water-based acrylic paint, such as Benjamin Moore or Behr. This type of paint is durable, easy to clean, and resistant to moisture and humidity.
Do I need to sand the cabinets before painting?
Sanding the cabinets before painting is recommended, ideally using fine sandpaper and TSP for optimum results. This will create a smooth surface for the paint to adhere to, and will ensure a long-lasting finish.
Can I paint over laminate bathroom cabinets with KILZ primer?
Yes, you can paint over laminate bathroom cabinets using Zinsser or KILZ as a primer. However, it is important to properly sand and clean the surface before painting, and to use a high-quality adhesive primer to ensure the paint adheres properly.
How many coats of paint do I need for bathroom cabinets?
The number of coats of paint needed for bathroom cabinets will depend on the quality of the paint and the color you are covering, especially when using products like INSL-X or Emerald Urethane Enamel. In most cases, two coats should be sufficient, but you may need more for darker colors or low-quality paint.
Do I need to seal the cabinets after painting with a Travertine tray organizer?
It is not necessary to seal bathroom cabinets after painting, as long as you have used a high-quality paint like Benjamin Moore. However, for extra protection, you can use a clear topcoat or polyurethane to seal the cabinets and provide a glossy finish.
How To Stay Motivated In Sports ?
How To Decorate A Small Bedroom ?